Monday, July 21, 2014

Heartbleed Bug Revisited


Although there have been lots of news and blogs discussing about Heartbleed bug which has been around for almost two years, I would like to recall myself about what was happening.


Here're some facts from Wiki:
  • Heartbleed is a security bug in the OpenSSL cryptography library. OpenSSL is a widely used implementation of the Transport Layer Security (TLS) protocol. 
  • Heartbleed may be exploited whether the party using a vulnerable OpenSSL instance for TLS is a server or a client. 
  • Heartbleed results from improper input validation (due to a missing bounds check) in the implementation of the TLS heartbeat extension, the heartbeat being the basis for the bug's name.
  • The vulnerability is classified as a buffer over-read, a situation where software allows more data to be read than should be allowed.
  • Heartbleed is registered in the Common Vulnerabilities and Exposures system as CVE-2014-0160.
  • The federal Canadian Cyber Incident Response Centre issued a security bulletin advising system administrators about the bug.
  • A fixed version of OpenSSL was released on April 7, 2014, on the same day Heartbleed was publicly disclosed.


Regarding how Heartbleed vulnerability can be exploited, the below comic is found to be well explaining to itself. (Reference)
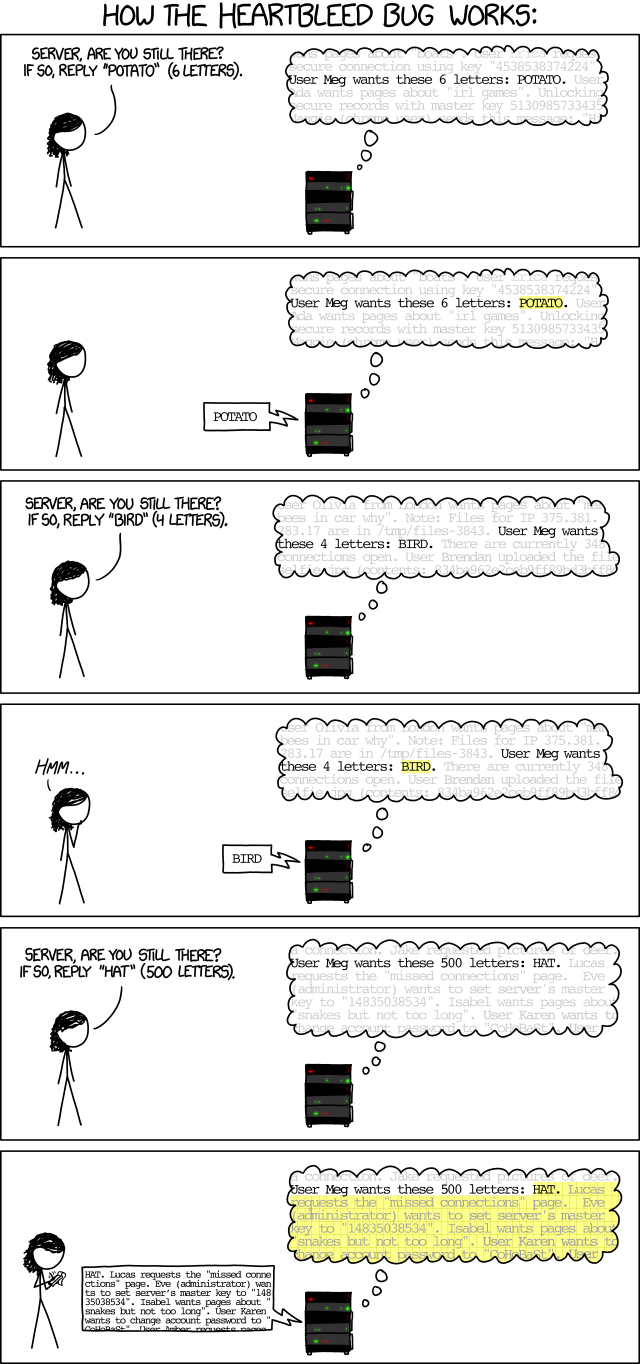


Heartbleed bug would affect Web servers which aim to provide secured HTTPS connection (port 443) to the clients. As the above comic explains, the web server seems to answer too much to the attacker who asks for longer response (500 letters) than the one she actually inputs ('HAT' 3 letters). Any letters beyond the first 3 letters becomes a bonus to the attacker who might actively record extra details she received at the other side. They could be random information like username, password, security log or any piece of information that helps a hacker to infiltrate into the vulnerable server.

Because it looks like a normal access to the web site between the client and the server, there is no log entry which might raise the alert of the system admin in order to figure out what's happening at the server side. The system admin would simply think the web server is providing secured service, with no knowing of people outside playing dirty tricks at all. In such case, a hacker with enough patience and basic probing skills could possibly compromise the web services. In other words, it might happen when he collects enough login information to disguise himself as a legitimate user.

A real world example is the vulnerable server would possibly respond to the attacker with up to 64 kilobytes of arbitrary data from the memory.

Although OpenSSH service (port 22) makes use of OpenSSL library, it is less likely to be affected.

Linux distros like Ubuntu and Linux Mint have a patch on OpenSSL library, so it's recommended people should check whether the actual built date of the library is after 7th Apr 2014 in order to insure a patch is applied properly.

Sample command to check OpenSSL library would be like this:

$ openssl version -a
OpenSSL 1.0.1f 6 Jan 2014
built on: Fri Jun 20 18:53:23 UTC 2014
platform: debian-i386
options:  bn(64,32) rc4(8x,mmx) des(ptr,risc1,16,long) blowfish(idx) 
compiler: cc -fPIC -DOPENSSL_PIC -DOPENSSL_THREADS -D_REENTRANT -DDSO_DLFCN -DHAVE_DLFCN_H -DL_ENDIAN -DTERMIO -g -O2 -fstack-protector --param=ssp-buffer-size=4 -Wformat -Werror=format-security -D_FORTIFY_SOURCE=2 -Wl,-Bsymbolic-functions -Wl,-z,relro -Wa,--noexecstack -Wall -DOPENSSL_BN_ASM_PART_WORDS -DOPENSSL_IA32_SSE2 -DOPENSSL_BN_ASM_MONT -DOPENSSL_BN_ASM_GF2m -DSHA1_ASM -DSHA256_ASM -DSHA512_ASM -DMD5_ASM -DRMD160_ASM -DAES_ASM -DVPAES_ASM -DWHIRLPOOL_ASM -DGHASH_ASM
OPENSSLDIR: "/usr/lib/ssl"


Useful tool like nmap can be used to check the target server.

Example Usage:


nmap -p 443 --script ssl-heartbleed


Script Output:

PORT    STATE SERVICE
443/tcp open  https
| ssl-heartbleed:
|   VULNERABLE:
|   The Heartbleed Bug is a serious vulnerability in the popular OpenSSL cryptographic software library. It allows for stealing information intended to be protected by SSL/TLS encryption.
|     State: VULNERABLE
|     Risk factor: High
|     Description:
|       OpenSSL versions 1.0.1 and 1.0.2-beta releases (including 1.0.1f and 1.0.2-beta1) of OpenSSL are affected by the Heartbleed bug. The bug allows for reading memory of systems protected by the vulnerable OpenSSL versions and could allow for disclosure of otherwise encrypted confidential information as well as the encryption keys themselves.
|
|     References:
|       https://cve.mitre.org/cgi-bin/cvename.cgi?name=CVE-2014-0160
|       http://www.openssl.org/news/secadv_20140407.txt
|_      http://cvedetails.com/cve/2014-0160/


Wednesday, May 21, 2014

Installing VMware vSphere Client 4.1 U3 on Windows Server 2012 R2

VMware vSphere Client 4.1 is not supported by Windows Server 2012 R2. This software was invented during WinXP regime and becomes not quite compatible with nowadays versions of Windows. Still, there are a few tricks to make it work again. I tested it on Windows 2012 R2 platform while it might be working on Windows 8 as well.

Before we proceed, we need to make sure that VMware ESXi platform has been installed properly on the target machine with a known IP address. This will lead to the next step of the installation process.

For the direct download of vSphere Client v4.1, please access the frontpage of your ESXi web management console via web browser (with URL like https://IP.TO.ESXI.MACHINE) and click on the hyperlink of Download vSphere Client. This makes sure that we have got the version of vSphere Client compatible with the actual ESXi environment we are managing.

The installation file will be named with something like: VMware-viclient-all-4.1.0-???????.exe

Assuming the file has been downloaded to a folder C:\Downloads\, we need to process it before use.

A little pre-requisite for vSphere Client is J# redistributable package which can downloaded via:

First, run the J# package to install so as to make Windows server meet the installation requirements. We can skip it if we already have the package installed or we may let vSphere Client installation file to deal with this.

Before the actual installation of vSphere Client V4.1, it is necessary to set some options on the installation file itself.

Right-click on the installation executable and select Properties. 

Under Compatibility tab, check the following checkboxes:

  • Run this program in compatibility mode for Windows 7
  • Run this program as an administrator

Double-click on the installation executable like VMware-viclient-all-4.1.0-???????.exe and it should run through the whole process successfully. 

After all, the icon of vSphere Client will appear on Windows Desktop.


Tuesday, April 29, 2014

Setup MySQL ODBC Driver for XAMPP on OS X Mavericks

This article is mainly for the setup of MySQL ODBC connection used in Apache server in OS X Mavericks. Of course, you can try it on OS X Lion or Mountain Lion as well.

Since Mac OS X 10.9 has been released, I have been searching for the way to revive the nearly forgotten feature of ODBC connection. As OS X is based on UNIX system, unixODBC is the first thing in mind for bridging the gap between various database products and the Mac world. Unfortunately, it is still too early to have a piece of working copy available for OS X 10.9.

As I don't remember wrong, it's a painful experience to implement a working ODBC setup on OS X platform. It's crucial to choose the right product among various combination of 32 bit and 64 bit drivers available yet we don't know which one will be working on the newest platform.

Here's the quick receipt which should work on OS X Mavericks:

Assuming we are using a lazy bundle of XAMPP for OS X package which in theory contains Apache (32 bit) and MySQL (32 bit). Since OS X is 64 bit platform which is able to run 32 bit applications, it is still safe to download a copy of 32 bit ODBC driver for use.

A recent version of MySQL connector ODBC should do the job. As of writing, it's version 5.3.2.
http://dev.mysql.com/get/Downloads/Connector-ODBC/5.3/mysql-connector-odbc-5.3.2-osx10.7-x86-32bit.dmg

OS X 10.9 doesn't provide ODBC Administrator in Utilities anymore. For GUI configuration, I go for the solution of ODBC manager:
http://odbcmanager.net/downloads/ODBC_Manager.dmg

Once we finish both of the software installations, we can start digging with Terminal commands.

In Terminal, we can can have a quick access to where ODBC configuration files are hiding under the tree of Filesystem.

The ODBC files should be located as follows:

System wide configurations:
/Libaray/ODBC/odbc.ini
/Libaray/ODBC/odbcinst.ini

These files are supposed to be empty or kept in basic information. They need further modification to get our ODBC connection working.
 Unfortunately, MySQL Connector has default installation of configuration files in user specific folder. It also creates two sample ODBC connections at the beginning of installation.

User specific configurations:
~/Libaray/ODBC/odbc.ini
~/Libaray/ODBC/odbcinst.ini

Now, we need to migrate the settings from user specific location to system wide location.

Two simple steps to get the job done:

Cut the content from ~/Libaray/ODBC/odbc.ini and paste it into /Libaray/ODBC/odbc.ini.

Cut the content from ~/Libaray/ODBC/odbcinst.ini and paste it into /Libaray/ODBC/odbcinst.ini.

Of course, you need to merge the content for the files so they contain unique section for each.

Remember to save the empty content back in ~/Library/ODBC/odbc.ini and ~/Library/ODBC/odbcinst.ini in order to eliminate any duplicate entries to be shown on ODBC Manager.

Open ODBC Manager and have a look if MySQL ODBC 5.3 ANSI Driver exist. We'll make use of this driver to create System DSN for

 Click Add... button in System DSN Tab and add the basic connection parameters:

For Apache's ODBC configuration, please have a look at here for more information:
http://httpd.apache.org/docs/2.4/mod/mod_dbd.html

It takes a little bit longer period of time to get MySQL ODBC drivers ready for mod_dbd since OS X 10.8. Now it's working.


Friday, February 21, 2014

To get rid of Firewall warning for particular application in Mac OS X Mavericks

Each time we open up an application which attempts to open a network connection in OS X, a firewall warning will always pop-up (in case you don't turn your firwall off) to ask for action like allowing a connection to be opened.

This might be annoying when you open your favourite app and get blocked by this warning everyday. The reason would be clear when you type the following command in Terminal for a check:

$
$ codesign -dvvvv /path to/your application


You probably received a feedback like this:

/path to/your application: code object is not signed at all

Well, it explains itself properly. You favourite app have not signed with a valid certificate. A valid cerficate, whether self-signed or genuine, should let OS X Firewall bypass the restriction and let the app open up network connection without warning.

You should not do the following steps unless you are pretty sure the app works normal and doesn't trigger any malicious activities, i.e., not a malware.

To generate your self-signed certificate, you can use OS X built-in app like "Keychain Access".


  • From the menu "Keychain Access", select item "Certificate Assistant" and then "Create a certificate ...".
  • Type in the name of your certificate in Name field and then select "Code signing" in Certificate Type selection box and then click "Create" button to generate new self-signed certificate. 


You may have to create different certificates for different apps so you can identify each one and revoke the certificate for the app in case you don't like it.

Remember the name of the self-signed certificate you created.

To sign the app you like, there are two options:

For single executable file without framework or plugins, you can try:

$
$ codesign -f -s "name of self-signed cert" /path to/your application


For big application (like *.app) with a set of framework or plugins, you should try adding option like --deep to sign every file recursively within that application:

$
$ codesign --deep -f -s "name of self-signed cert" /path to/your application


To verify the details of code signing for this app, you can re-type a command in Terminal like this:

$
$ codesign -dvvvv /path to/your application

This time you will see those signing attributes like Identifier, Hash type, CDHash, Authority and Signed time showing up properly.

After this, you can try opening your favourite app and this time no more Firewall warning should appear.


Friday, February 7, 2014

Mac OS X: Prevent .DS_Store file creation over network connections

Mac user may find it uncomfortable for leaving the trace when opening files or folders on the remote file server. Some hidden files like .DS_Store will be created automatically, sadly, without any acknowledgment to the user.

Here comes the hint to disable this feature on remote storage access (for Mac OS X 10.4 or later only):

To configure a Mac OS X user account so that .DS_Store files are not created when interacting with a remote file server using the Finder, follow the steps below:
Note: This will affect the user's interactions with SMB/CIFS, AFP, NFS, and WebDAV servers.
  1. Open Terminal.
  2. Execute this command:
    defaults write com.apple.desktopservices DSDontWriteNetworkStores true
  3. Either restart the computer or log out and back in to the user account.
If you want to prevent .DS_Store file creation for other users on the same computer, log in to each user account and perform the steps above—or distribute a copy of the newly modified com.apple.desktopservices.plist file to the ~/Library/Preferences folder of other user accounts.

Additional Information

These steps do not prevent the Finder from creating .DS_Store files on the local volume, and these steps do not prevent previously existing .DS_Store files from being copied to the remote file server.
Disabling the creation of .DS_Store files on remote file servers can cause unexpected behavior in the Finder (clickhere for an example).
Ref: http://support.apple.com/kb/ht1629


Wednesday, January 22, 2014

Start headless Windows guest VM in Virtualbox

Virtualbox offers open source implementation of desktop virtualization technology for muli-OS users and developers.

Newest version of Virtualbox is v4.3.6 while running a headless VM as remote server instance can lead to lower resources consumption and faster response on the host computer.

Before starting a headless VM, you need to make sure the VM has Remote Display setup properly. Once a headless VM starts running, the easy way to access the VM would be using RDP viewer. This is particularly useful when you run a headless Windows VM.

To run a VM in headless mode, we can issue the following command:

$
$ vboxheadless --startvm "WHATEVER NAME IT IS FOR VM"


In case of using Virtualbox GUI, you can hold SHIFT key while clicking on START button for the target VM.

If you run into a famous error like NS_ERROR_CALL_FAILED: segmentation fault 11, you should take a look at the setting of the VM whereas 3D acceleration under Video tab should be turned off. You probably don't need 3D acceleration on a headless server VM so it doesn't cause much performance impact at all.


Tuesday, July 30, 2013

pfSense e-mail alerts sent to multiple recipients

pfSense is an all-in-one UTM appliance for firewall, security and network management purposes.


Since my lab doesn't allow a static IP assigned to my pfSense box so I sticked on to DHCP IP address which may be varying along the time. The fact is that I don't own the DHCP server myself so I can't even assign a fixed LAN IP address to this box. Each time something has changed, I need to get back to pfSense console and find out it's WAN IP address myself. That means I can't find out IP address remotely at home whenever DHCP server changes its IP address.

The latest version of pfSense is v2.2.2 at the time of writing.

pfSense comes with various kinds of installable packages whereas one of the useful one would be "mailreport".

To install this mailreport, just get in pfSense web console and click [System]->[packages], then choose to install mailreport.

Once finished, you can open it up by clicking [Status]->[Email Reports] option.

In there, you can create new email report. Just remember to add one new item under "Report Commands" Section. This can be a simple Unix command like ifconfig which shows current IP address of the pfSense box. I personally set it to send out email report once per day in the morning so I get the latest information I need before starting to work.

To configure email alert setting, click [System]->[Advanced] and then [Notifications] tab. Fill in correct SMTP information under Section SMTP E-mail.

But, hang on! There was a problem with the field "Notification E-mail Address" that it only takes one email address ONLY. That should be enough for solely test purposes.


However, I get my colleagues working with me so I would like to send email alerts to all members within my group. The pfSense web console is actually produced by PHP code, so we might need to have a little change inside the PHP source code itself.

Here are the changes we need to make for sending E-mail alerts to multiple recipients:

/etc/inc/mail_reports.inc


...
$mail->ContentType = 'text/html';
$mail->IsHTML(true);
$mail->AddReplyTo($config['notifications']['smtp']['fromaddress'], "Firewall Email Report");
$mail->SetFrom($config['notifications']['smtp']['fromaddress'], "Firewall Email Report");
$address = $config['notifications']['smtp']['notifyemailaddress'];
/* New lines start here */
    $addr_array = preg_split("/[\s,]*(\,|\;|\:)[\s]*/", $address);
    foreach($addr_array as $addr){
           $mail->AddAddress($addr, "Report Recipient ".($addr_count++));
    }
/* New lines end here */

/* Comment out the line below */
//$mail->AddAddress($address, "Report Recipient");
$mail->Subject = "{$config['system']['hostname']}.{$config['system']['domain']} Email Report: {$headertext}";
$mail->Body .= "This is a periodic report from your firewall, {$config['system']['hostname']}.{$config['system']['domain']}.

Current report: {$headertext}
\n
\n";
...

After the changes to the PHP file, you can test it by entering email addresses into the field  "Notification E-mail Address" with coma separator, like "recipient1@a.little.test.co,recipient2@a.little.test.co,recipient3@a.little.test.co". Just make sure no space is used between the email addresses and all those guys should receive the test messages immediately.

Fingers crossed;-)


Thursday, July 18, 2013

Compiling mod_auth_mysql.so under Mountain Lion OSX 10.8 with XAMPP for Mac (Apache v2.4)


First thing first! Install your favourite Bitnami XAMPP for Mac package:

http://www.apachefriends.org/en/xampp-macosx.html

At the time of writing, the latest version is v1.8.2 which includes newest Apache v2.4 as web server. This is where the problem is and we are going to sort this out and compile new mod_auth_mysql.so.

Make sure you setup XAMPP properly with appropriate passwords created for Apache and MySQL and so on…

!!!REMIND!!!
Before your spiritual work, make sure you stop Apache server so nothing should be affected during the compiling process.

The source code of mod_auth_mysql is a bit old to support Apache v2.4 web server whereas a little bit of extra work is required to get APXS compiling working.

Download C source code of mod_auth_mysql:

http://sourceforge.net/projects/modauthmysql/files/modauthmysql/3.0.0/mod_auth_mysql-3.0.0.tar.gz

Extract the mod_auth_mysql-3.0.0.tar.gz file which gives you a folder called "mod_auth_mysql-3.0.0".

Using Terminal command:

$ cd mod_auth_mysql-3.0.0


You will see the source file named "mod_auth_mysql.c" and we are going to work on it.

Download a patch file within the folder and patch it right there as follows:

$
$ curl http://www.zoosau.de/wp-content/uploads/mod_auth_mysql-300-apache-22.patch


$
$ patch < mod_auth_mysql-300-apache-22.patch


The patch fixes some problems for APXS compiling. For Apache v2.4, we have to do some more editing in the file "mod_auth_mysql.c".

Open up editor for the file "mod_auth_mysql.c":

$ open -e mod_auth_mysql.c


Modify the lines as described below:

==========================================================
LINE 908:
  return r->connection->remote_ip;

Changed to:
  return r->connection->client_ip;
==========================================================
LINE 1273:
const apr_array_header_t *reqs_arr = ap_requires(r);

Changed to:
const apr_array_header_t *reqs_arr = NULL;
==========================================================
LINE 1275:
const array_header *reqs_arr = ap_requires(r);

Changed to:
const array_header *reqs_arr = NULL;
==========================================================

Explanation:

It's a bit technical and requires you to read Apache manual first about new Apache 2.4 which explicitly takes ap_requires() function completely out of core services.

Looking through those forums and finally get something closed to that problem. A possible fix:

http://www.mail-archive.com/pld-cvs-commit@lists.pld-linux.org/msg313889.html

As function ap_requires() is removed from Apache v2.4 API, we can set related reference pointer to NULL in order to skip that problem in mod_auth_mysql.c file.

For the solution of LINE 908, thanks to the blogger on http://cootos.sinaapp.com/?p=94 .

Now comes the actual compiling work.

Reference is here:
http://www.nilspreusker.de/?s=mod_auth_mysql

But we need to modify the paths to port them to those paths in XAMPP for Mac package.

Using Terminal command as follows:

$
$
$ sudo /Applications/XAMPP/bin/apxs -c -i -a -D -lmysqlclient \
 -lm -lz -I/Applications/XAMPP/XAMPPfiles/include/ \
 -L/Applications/XAMPP/XAMPPfiles/include/ \
 -Wc,"-arch x86_64" -Wl,"-arch x86_64" mod_auth_mysql.c


It's a long command which I spilt it into four lines so you may have to recombine them in the text editor before you issue the actual command.

If things are going well, you should see the following output generated by the above command:

/Applications/XAMPP/xamppfiles/build/libtool --silent --mode=compile gcc -std=gnu99 -prefer-pic -I/Applications/XAMPP/xamppfiles/include/c-client -I/Applications/XAMPP/xamppfiles/include/libpng -I/Applications/XAMPP/xamppfiles/include/freetype2 -O3 -L/Applications/XAMPP/xamppfiles/lib -I/Applications/XAMPP/xamppfiles/include -I/Applications/XAMPP/xamppfiles/include/ncurses -arch x86_64  -DDARWIN -DSIGPROCMASK_SETS_THREAD_MASK -no-cpp-precomp -DDARWIN_10  -I/Applications/XAMPP/xamppfiles/include  -I/Applications/XAMPP/xamppfiles/include/apr-1   -I/Applications/XAMPP/xamppfiles/include/apr-1 -I/Applications/XAMPP/xamppfiles/include -arch x86_64 -I/Applications/XAMPP/XAMPPfiles/include/  -c -o mod_auth_mysql.lo mod_auth_mysql.c && touch mod_auth_mysql.slo
mod_auth_mysql.c: In function 'str_format':
mod_auth_mysql.c:891: warning: format '%d' expects type 'int', but argument 8 has type 'long int'
/Applications/XAMPP/xamppfiles/build/libtool --silent --mode=link gcc -std=gnu99 -Wl,-rpath -Wl,/Applications/XAMPP/xamppfiles/lib -L/Applications/XAMPP/xamppfiles/lib -I/Applications/XAMPP/xamppfiles/include -arch x86_64 -L/Applications/XAMPP/xamppfiles/lib -L/Applications/XAMPP/xamppfiles   -o mod_auth_mysql.la -arch x86_64  -L/Applications/XAMPP/XAMPPfiles/include/ -lmysqlclient -lm -lz -rpath /Applications/XAMPP/xamppfiles/modules -module -avoid-version    mod_auth_mysql.lo
/Applications/XAMPP/xamppfiles/build/instdso.sh SH_LIBTOOL='/Applications/XAMPP/xamppfiles/build/libtool' mod_auth_mysql.la /Applications/XAMPP/xamppfiles/modules
/Applications/XAMPP/xamppfiles/build/libtool --mode=install install mod_auth_mysql.la /Applications/XAMPP/xamppfiles/modules/
libtool: install: install .libs/mod_auth_mysql.so /Applications/XAMPP/xamppfiles/modules/mod_auth_mysql.so
libtool: install: install .libs/mod_auth_mysql.lai /Applications/XAMPP/xamppfiles/modules/mod_auth_mysql.la
libtool: install: install .libs/mod_auth_mysql.a /Applications/XAMPP/xamppfiles/modules/mod_auth_mysql.a
libtool: install: chmod 644 /Applications/XAMPP/xamppfiles/modules/mod_auth_mysql.a
libtool: install: ranlib /Applications/XAMPP/xamppfiles/modules/mod_auth_mysql.a
chmod 755 /Applications/XAMPP/xamppfiles/modules/mod_auth_mysql.so

Now it's time to modify a working https.conf for Apache v2.4.

In httpd.conf, find those lines with LoadModule * statements and add the following two statements at the bottom of that section:

#
#
#
LoadModule apreq_module modules/mod_apreq2.so
LoadModule mysql_auth_module modules/mod_auth_mysql.so
#


This make sure the target libraries are called up when Apache starts.

Before you start Apache server again to test if it runs or not, you have one more thing to do. In my experience, Apache server may not start because of libmyqlclient error. This is the case when we have no other MySQL client setup on the Mac before.

All you have to do is creating new symbolic link to let Apache v2.4 find the right library:

$
$ sudo ln -s /Applications/XAMPP/xamppfiles/lib/libmysqlclient.18.dylib \
 /usr/lib/libmysqlclient.18.dylib
$


Now start your Apache v2.4 web server and see if it's running properly. If yes, you are ready to use mod_auth_mysql module again!

Happy coding!!!

PS: Additionally you'll need to make sure PHP Session is working.
In /Applications/XAMPP/xamppfiles/etc/php.ini, you need to uncomment a line like this:
session.save_path = "/tmp"


This should do the trick;-)


Thursday, June 13, 2013

Setup Cygwin CRON service on Windows platform


Assuming we are going to run a Batch File containing those scripts for daily operations, Windows Scheduled Tasks feature offers useful scheduling capability for backup and cleaning operations on Windows server. However, you never get what you want when you want it on Windows platform.

It takes extra steps in configuring Local Policy to allow the user to have a permission of "Log on as Batch Job" in order to add a scheduled task successfully. That might not always happen in a SysAdmin point of view. This always remind me of the useful tools Cygwin which run linux program within Windows. Of course, you can also call Windows program from there. Combined with Cron in Cygwin, you can schedule daily tasks from Cygwin like Windows Scheduled Tasks.


To install cygwin, please refer to the following article:
http://docs.oracle.com/cd/E24628_01/install.121/e22624/preinstall_req_cygwin_ssh.htm

*Reminder:

  • You might need to install extra package for cron within cygwin setup.
  • During Cygwin setup, please make sure you have also selected cron by entering 'cron' in search field and mark it as INSTALL.
  • Please install Cygwin to the root directory of local drive to get rid of those annoying restrictions.


Once you've got Cygwin setup properly on Windows, you can start installing Cron service on Windows.

Here's the command to install new cron service:
#
#Within Command Prompt Terminal
C:\>cd c:\cygwin\bin
C:\cygwin\bin>cygrunsrv -I Cygwin_CRON_JOBS -p /usr/sbin/cron -a -n
#


On Windows desktop, open Control Panel -> Administrative tasks -> Services.
Then look up a service name "Cygwin_CRON_JOBS" which we specified as above.
Make sure this service is started and running properly.

For local user, we might just define the scheduled tasks like this:
#
# Within normal opening Cygwin Terminal
$ crontab -e
# Minute   Hour   Day of Month       Month          Day of Week        Command  
# (0-59)  (0-23)     (1-31)    (1-12 or Jan-Dec)  (0-6 or Sun-Sat)              
    0        2          12             *               0,6           /cygdrive/c/somewhere/something.bat
#

However, this doesn't work in most cases whereas we haven't got sufficient permissions to run CRON tasks in Windows.
For domain user, some extra work needs to be done:
#
# Open Cygwin Terminal by right clicking the icon and selecting [run as Administrator]
# Within Cygwin Terminal ~
$ touch /etc/crontab
# Take ownership for SYSTEM user on this file
$ chown SYSTEM /etc/crontab
# To avoid famous BAD FILE MODE error in Cygwin, try chmod command
# Cron stops working on world editable file due to security reason
# To stop error message, let's make it editable ONLY to the file owner
$ chmod 0644 /etc/crontab
$ crontab -e
# Minute   Hour   Day of Month       Month          Day of Week        Command  
# (0-59)  (0-23)     (1-31)    (1-12 or Jan-Dec)  (0-6 or Sun-Sat)              
    0        2          12             *               0,6           /cygdrive/c/somewhere/something.bat
#

To run Windows program within crontab, you can start from the following path:
/cygdrive/c/...
/cygdrive/d/...

which points to the root directory of the local drives where your favourite commands and batch files are locating.
Make sure the path is correct by listing them like:
#
# Within Cygwin Terminal
$ ls -l /cygdrive/c/Windows
#


For additional information about user account created for cron Windows service, please read here:
http://www.davidjnice.com/articles/cygwin_cron-service.html

Hope you can run your favourite tasks in Cron now.

Friday, June 7, 2013

Convert .p12 bundle to server certificate and key files for Nginx

SSL certificate is a must for nowadays e-commerce site whereas newly emerged web server like Nginx has gained so much attention due to its performance when dealing with heavy traffic to the web site. Why do those people choose Nginx?

Nginx's unique architecture makes it easy to handle large number of concurrent connections at one time with low CPU and memory consumption, compared with IIS and Apache.

Nginx has also taken the place as the front-end proxy server for traditional web servers like IIS and Apache.

Now, back to the topic we are facing today.

Assuming you have received .p12 file from your trust provider, you might need to know more about what a .p12 file is.

According to wiki, PKCS #12 defines an archive file format for storing many cryptography objects as a single file. It is commonly used to bundle a private key with its X.509 certificate or to bundle all the members of a chain of trust.

This means a .p12/.pfx file contains everything we need to provide SSL services, like server certificates, CA root certificate, intermediate chain certificates and server private key.

Unlike .pem file, .p12/.pfx file is in binary form so we cannot copy and paste those blocks for use in a human readable format. It needs a conversion tool like openssl to extract necessary files for the web server like Nginx.

Nginx is also sensitive to the order of server certificate and other CA root and chain certificates in a bundle .pem file so it may not start up properly with a .pem file which has been tempered with no proper knowledge.

Here're the two commands to generate necessary certificate bundle and server key files from a .p12/.pfx bundle file which is supposed to be directly imported into IIS web erver.

#
#
#Generate certificates bundle file
> openssl pkcs12 -nokeys -in server-cert-key-bundle.p12 -out server-ca-cert-bundle.pem
#
#
#Generate server key file
> openssl pkcs12 -nocerts -nodes -in server-cert-key-bundle.p12 -out server.key
#
#

whereas you might be asked to input the password which was included in .p12 file during the creation.

In Niginx.conf, we can include these two files for SSL connection:
#
#
server {
        listen   443 default ssl;
        server_name  localhost ...;

        ssl                  on;
        ssl_certificate      /some_where/ssl_cert/server-ca-cert-bundle.pem;
        ssl_certificate_key  /some_where/ssl_cert/server.key;

        ssl_session_timeout  5m;

        ssl_protocols  SSLv2 SSLv3 TLSv1;
        ssl_ciphers  HIGH:!aNULL:!MD5;
        ssl_prefer_server_ciphers   on;
    
#...  
#


After that, Nginx should start up properly with HTTPS protocol ready for the web site.