Friday, November 6, 2015

Install PHP 7 + mod_fcgid + opcache on Ubuntu 14.04


PHP 7 has become a hot topic in recent time as it claims to have the running speed catching up with HHVM whereas no big change in the source code is required, except for those deprecated function calls in the new release.

This is good news as nowadays Guest VM for hosting tends to be slim and small in terms of resources, i.e., 512MB, 256MB or smaller. Running a plain old build of Apache server with default settings is going to slow down everything.

This is a quick guide for a fresh installation of LAMPP server with newest PHP 7 engine on top of it. To maintain high response rates without interruption in a high concurrency situation, you may want to run PHP in CGI mode. Please check those steps below carefully. For the god sake, you might miss something along the passage without the help of a cup of coffee which is exactly my situation.

PHP 7 is now in the final stage before the official release is out. So, the source update is happening frequently than ever. As of the time of writing, it is PHP 7.0.0 RC 6. Of course, no one would like to miss that bit, even for nightly update.


Here we start in Terminal app on Ubuntu 14.04:

Step 1:


Try installing LAMPP from the ground up:

$
$ sudo apt-get update && sudo apt-get install lamp-server^


Please mind the caret (^) at the end.

You will have to install packages for Apache 2, MySQL & PHP 5 (not PHP 7 at the moment).

Step 2: (Optional)


You might want to upgrade a bit for the not-so-entirely-new version of Apache 2 which is locked in version 2.4.7 in Ubuntu 14.04 LTS Release as LTS implies not only a stable build but also less frequent update to its packages.

For upgrading Apache 2, you may add new repo to Ubuntu's source list and do a forced re-installation:

$
$ sudo apt-get install python-software-properties
$ sudo add-apt-repository ppa:ondrej/apache2
$ sudo apt-get update && sudo apt-get -f install apache2
$

Step 3:
Obtain PHP 7 early release


This is to add Zends PHP7 early access repo:

$
$ sudo echo "deb http://repos.zend.com/zend-server/early-access/php7/repos ubuntu/" >> /etc/apt/sources.list
$


To install PHP7 nighly build, we need to issue the following command:

$
$ sudo apt-get update && sudo apt-get install php7-nightly
$


Once done, PHP7 will be installed to /usr/local/php7. So you might want to keep this in mind to find something important regarding PHP configuration.

To use PHP7 with Apache, first make sure Step 1 is done properly, then copy the required modules and libs to Apache 2 folder:

$
$ sudo cp /usr/local/php7/libphp7.so /usr/lib/apache2/modules/
$ sudo cp /usr/local/php7/php7.load /etc/apache2/mods-available/
$


For initial PHP with OpCache configuration, we can create new php.ini in the following path:

/usr/local/php7/php.ini

Please copy and paste the following parameters into php.ini:
max_execution_time=600
memory_limit=128M
error_reporting=0
display_errors=0
log_errors=0
user_ini.filename=
realpath_cache_size=2M
cgi.check_shebang_line=0
zend_extension=opcache.so
opcache.enable_cli=1
opcache.save_comments=0
opcache.fast_shutdown=1
opcache.validate_timestamps=1
opcache.revalidate_freq=60
opcache.use_cwd=1
opcache.max_accelerated_files=100000
opcache.max_wasted_percentage=5
opcache.memory_consumption=128
opcache.consistency_checks=0


Step 4:
Install mod_fcgid module


$
$ sudo apt-get install libapache2-mod-fcgid
$


Step 5:
Enable and disable relevant Apache modules


Default build of Apache use MPM Event but for mod_fcgid to work we need to enable MPM Worker instead. Before enabling new MPM, we need to disable previously enabled MPM modules first.

For one important thing here, you might have to entirely disable PHP5 module in order to avoid any conflict with the upcoming PHP7. Apache can't have both PHP5 and PHP7 modules loaded for the same .php filetype handling or else Apache won't even start.

$
$ sudo a2dismod mpm_event
$ sudo a2dismod mpm_prefork
$ sudo a2enmod mpm_worker
$ sudo a2dismod php5
$


Step 6:
Enable SSL in Apache


Enable SSL module as follow:

$
$ sudo a2enmod ssl
$ sudo mkdir /etc/apache2/ssl
$

Prepare self-signed certificate:

$
$ sudo openssl req -x509 -nodes -days 3650 -newkey rsa:2048 -keyout /etc/apache2/ssl/apache.key -out /etc/apache2/ssl/apache.crt
$

The key and certificate will be created and placed in your /etc/apache2/ssl directory.

Open the default SSL configuration file with root privileges now:

$
$ sudo nano /etc/apache2/sites-available/default-ssl.conf
$

Modify two lines to match the newly created certificate files:

        SSLCertificateFile /etc/apache2/ssl/apache.crt
        SSLCertificateKeyFile /etc/apache2/ssl/apache.key

And finally it may look like this:
<IfModule mod_ssl.c>
    <VirtualHost _default_:443>
        ServerAdmin webmaster@localhost
        DocumentRoot /var/www/html
        ErrorLog ${APACHE_LOG_DIR}/error.log
        CustomLog ${APACHE_LOG_DIR}/access.log combined
        SSLEngine on
        SSLCertificateFile /etc/apache2/ssl/apache.crt
        SSLCertificateKeyFile /etc/apache2/ssl/apache.key
        <FilesMatch "\.(cgi|shtml|phtml|php)$">
                        SSLOptions +StdEnvVars
        </FilesMatch>
        <Directory /usr/lib/cgi-bin>
                        SSLOptions +StdEnvVars
        </Directory>
        BrowserMatch "MSIE [2-6]" \
                        nokeepalive ssl-unclean-shutdown \
                        downgrade-1.0 force-response-1.0
        BrowserMatch "MSIE [7-9]" ssl-unclean-shutdown
    </VirtualHost>
</IfModule>

To activate SSL Virtual Host, please type:

$
$ sudo a2ensite default-ssl.conf
$


Step 7:
Add mod_fcgid related configurations


Go find the default configuration files for Apache, like

/etc/apache2/sites-enabled/000-default.conf

/etc/apache2/sites-enabled/default-ssl.conf

Edit each file with the following instructions.

Add the following configuration to the root directory section in the vhost block:

<Ifmodule mod_fcgid.c>
 # FCGID registers a handler named fcgid-script
 AddHandler fcgid-script .php
 Options +ExecCGI
 FcgidWrapper /usr/local/php7/bin/php-fcgid-wrapper
</IfModule>


Also, add the relevant settings outside the vhost block:

<Ifmodule mod_fcgid.c>
 # Context - server config
 FcgidMaxProcesses 150
 # Otherwise php output shall be buffered
 FcgidOutputBufferSize 0
</IfModule>


Step 8:
Add Wrapper script of php-cgi


Now you need to create the wrapper script that is used by mod_fcgid to launch php-cgi processes.

Script filename: php-fcgid-wrapper

#!/bin/sh
# Set desired PHP_FCGI_* environment variables.
# Example:
# PHP FastCGI processes exit after 500 requests by default.
PHP_FCGI_MAX_REQUESTS=10000
export PHP_FCGI_MAX_REQUESTS
# Replace with the path to your FastCGI-enabled PHP executable
exec /usr/local/php7/php-cgi


The actual location of the wrapper script at /usr/local/php7/bin/php-fcgid-wrapper can be stored anywhere and the path has to be mentioned in apache configuration.

Make the wrapper script executable using chmod:

$
$ chmod +x /usr/local/php7/bin/php-fcgid-wrapper
$


Step 9:
Turn on Apache server


This is the final and the most important step for all those configurations we have made:

$
$ sudo service apache2 restart
$

Step 10:
Testing


You can open a browser locally and visit https://localhost to check if SSL connection is working properly.

Or, try create a simple php info page to see if all parameters are setting as desired:

$
$ sudo echo "<php phpinfo();" /var/www/html/test_me.php
$

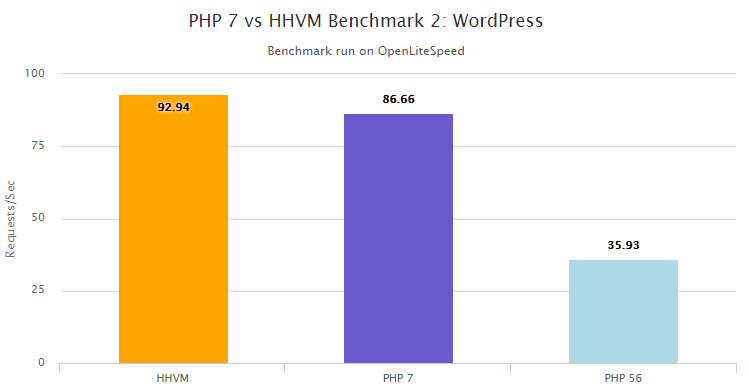
It's been a long time PHP's performance seems to be lagging behind since Facebook's era comes. People who are aggressive might lean to take HHVM approach to accelerate things up, yet the development team might meet new challenges with switching coding practice and taking the risk of incompatibility with official PHP release.


You go for the option of PHP7 as you have the needs for speed. Forgetting about compatibility and performance sacrifice, let's test your apps with this brand new PHP engine!


Sunday, October 4, 2015

Fix Hombrew problems after upgrading Mac OS X from Mavericks to El Capitan, skipping Yosemite

I have been sticking with Mavericks (OS X 10.9.x) since released and now skip Yosemite and directly upgrade to the solid build of El Capitan (OS X 10.11). It's just a direct upgrade and things seem to be working after a couple of reboots.

Well, we all know installed packages may not work at all. For instance, Developer tools like Homebrew seems broken again.

As seen on the Github, people have started collaborating with each others to resolve this.

https://github.com/Homebrew/homebrew/issues/40519

First thing to fix broken Homebrew directory is the permission issue. Error like this for brew update command:

xcrun: error: invalid active developer path (/Library/Developer/CommandLineTools), missing xcrun at: /Library/Developer/CommandLineTools/usr/bin/xcrun
Stashing your changes:
xcrun: error: invalid active developer path (/Library/Developer/CommandLineTools), missing xcrun at: /Library/Developer/CommandLineTools/usr/bin/xcrun
Error: Failure while executing: git stash save --include-untracked --quiet


So, try the following command first:

sudo chown $(whoami):admin /usr/local && sudo chown -R $(whoami):admin /usr/local

Second trial of brew update, another error appeared while doing brew update as follows:

Error: Failure while executing: git pull -q origin refs/heads/master:refs/remotes/origin/master.

Since major upgrade, we need to install recent release of Xcode Command Line Tools. An easy way is to install Xcode 7.0.1 from AppStore and then open Xcode to agree the terms and conditions.

Within CXcode, click menu item:

[Xcode]->[Open Developer Tool]-> [More Developer Tools...]

It helps to open Apple's download website for Developer Tools.

Click to download and install the following package :

Command Line Tools OS X 10.10 for Xcode 7

Reopen Terminal again and then try brew update, once again another error message shows up. But this time it looks like things get fixed by the second call of brew update command. So, issue the update command twice to get itself fixed and ready:

$brew update
#Error message...
$brew update
#It works this time...


Saturday, September 26, 2015

Ultimate Guide on TP-LINK Archer C2 AC750 Wireless Dual Band Gigabit Router - USB Printer sharing on OS X

This guideline should be applying to any USB compatible printer for sharing on OS X over the USB port of TP-LINK Archer C2 Wireless Router.


The best thing of this router is that it's NBN ready and has both WAN/LAN ports supporting up to 1000Mbps which is abundant for movie streaming and VOIP communications within local network and a possible extension to future upgrade of NBN services. As for 802.11ac standard, this router does the right job for 5GHz Wi-fi transfer which is up to 433Mbps. It's also backward compatible with 802.11b/g/n. The cost is average but you might feel good about having an 802.11ac compliant router with this price tag. Compared with my old 802.11n router, it really makes a difference in terms of the speed and stability. One benefit is beamforming if you are using newer Macbook with antenna supporting 802.11ac standard.

Ref: http://www.tp-link.com.au/products/details/cat-9_Archer-C2.html

However, the firmware and software support is limited for this brand. Yet, it's still possible to find have a software upgrade to make things working.

First thing first, upgrade the firmware to the latest stable version via here:

Ref: http://www.tp-link.com.au/download/Archer-C2.html#Firmware

High-end product like Archer C7 is based on the same architecture as C2 so their technical support recommended using newer version of software available for Archer C7 instead.

Ref: http://www.tp-link.com.au/products/details/cat-9_Archer-C7.html

The key to bridge up the USB printer connected to the router is the software called:
TP-LINK USB Printer Controller

It's better to use the package from a recent release of newer product line like Archer C7:

Try downloading the installation package 

Archer C7_V2_USB_Printer_Controller_Installer_Mac 

from here:

http://www.tp-link.com.au/download/Archer-C7.html#Utility 

Extract it and find the .DMG file to install on Mac OS X:

TP-LINK_USB_Printer_Controller_Installer_Mac.dmg

A system reboot is required.

Before opening the printer controller software, it is necessary to have USB printer plugged into your Mac computer first and finish an initial setup based on USB connection. Assuming you have the printer driver for your USB printer, it's an easy but important step to setup a local printer profiler on your Mac.

Once it's successful on setting up your print via local USB connection, you should have a available local printer in "Printers and Scanner" Control Panel. 

Now you can proceed to plug the USB printer into the USB port of TP-LINK Wireless Router for remote setup.

The software TP-LINK USB Printer Controller will let you to bridge up the remote printer to your local USB printer profile. It may show offline at first but will turn into online mode after the first remote printing is done successfully.

Assuming you are connecting to the Wi-Fi network from TP-Link Wireless Router, you need to open up TP-LINK USB Printer Controller interface. 

Under the Router's name, you should find the USB printer device (whether it's UNKNOWN or exactly the printer model name) already connected to the router. 


Click on the printer device and click on Auto menu button and then "+Set Auto-Connect Printer" button to find the installed printer list of available local printer profiles on you Mac. 

Select the target printer profile and click Apply button to link up the remote printer and you're done.

Remember to keep TP-LINK USB Printer Controller Window opening during remote printing process. Now, you can have a try to print out anything you like with your local printer profile on your Mac and the print job will be redirected to the shared printer on the wireless router.


Tuesday, August 4, 2015

Solving IE problem the HTML way - "This page contains both secure and nonsecure items. Do you want to display the nonsecure items?"

For some reason, IE may complain about mixed content while visiting the website via TLS/SSL. From the user point of view, the only way to resolve this would be changing setting in IE browser.

However, the developer may do a little bit more to tackle this and eliminate possible cause to trigger this kind of error message on IE.

As what many forum users suggested, the first thing to look in the source code would be src attribute of image files which sometimes points to non-HTTPS URL and lead to error.

For what I have been experiencing is somehow a bit different than this common syntax error, IE reports mixed content error when I insert something simple like this:


...
< div style="display:none" >
< input id="but" name="but" onclick="..." type="button" value="Press Here" /> 
< div />
...


To hide particular <div /> container, there is no other simpler way than the one above. As you can see there is an input button within invisible <div /> container. This tiny input button DOES create trouble as IE actually complains mixed content error from here.

So, let's have a change to the code and make IE silent with this:


...
< div style="display:none" >
<span class="CSS_button_style" id="but" name="but" onclick="..." > Press Here </span>
< div />
...


We basically swap <input /> element with <span /> element and try the best to make it look like the original button by using CSS. User should not notice any difference if we apply CSS style which mimics the style of button <input /> element.

Monday, May 4, 2015

Install Perl HL7 Toolkit on XAMPP OS X Mavericks

Perl version HL7 Toolkit is in its alpha stage but offers general support to HL7 V.2 messaging.

The Perl HL7 toolkit consists of:

Net::HL7, a lightweight Perl API for parsing, formatting, manipulating, sending and receiving HL7 messages,
hl7d, an implementation of a forking HL7 server for inbound interfaces, and
hl7qd, an HL7 queue daemon for outbound interfaces.

For basic testing, we'll need Perl module like Net::HL7 installed properly and a running HL7 server like hl7d daemon.

OS X Mavericks comes with its own version of Perl which is suitable for running scripts for system administration whereas most users should avoid touching it for development.

Alternatively, users can install their favourite version of Perl to run the scripts with specific modules installed on the system.

For web development, bundled package like XAMPP is accompanied with latest version of Perl which collaborates with Apache module mod_perl to delivery services to Internet users.

With CPAN already installed under XAMPP folder, it's easy to install the toolkit.

For the very first time using of CPAN under XAMPP by simply typing

$ /Applications/XAMPP/xamppfiles/bin/cpan

in Terminal Window, you'll be asked questions to setup the environment and you can almost give default answer to every single question of this. Once done, you're ready to install Perl module to support HL7 within XAMPP.

To run HL7 toolkit, you'll need Perl module Net::HL7:
$ /Applications/XAMPP/xamppfiles/bin/cpan install Net::HL7


Before all these, just need to make sure the version of Perl running as default to be in the path of XAMPP installation, i.e., /Applications/XAMPP/xamppfiles/bin/

For sure, please run a test like this:
$ which perl
/Applications/XAMPP/xamppfiles/bin/perl

Please notice that most Perl scripts may start with the beginning statement like this:
#!/usr/bin/perl

This actually points to the default installation of Perl whereas desired Perl modules like Net::HL7 might not exist at all.

To test whether your version of Perl has desired module installed, please try this command:

$ perl -e 'use XXXX::xxxx;'

If the specific module is not installed, general error message would be like this even after installing your favourite Perl module with CPAN:

Can't locate XXXX/xxxx.pm in @INC contains: ...

So, basically, you should not run Perl script by just typing ./?????.pl in Terminal. Instead, using full path of Perl to call the script:

$ /Applications/XAMPP/xamppfiles/bin/perl ./?????.pl

This ensure that your desired version of Perl is used to run the script.

To install hl7d server, you may download the package to local drive via this link:
http://hl7toolkit.sourceforge.net/#hl7d

Unzip the *.tar.gz file to extract a folder with source code for building:
$ tar -xzf hl7d-(version).tgz

And then start installation in good old fashion style:
$ cd hl7d-
$ perl Makefile.PL PREFIX=
$ make
$ make test (none yet, but read the output!)
$ make install

You can also copy sample scripts to hl7d's installation directory.
$ cp t/* /usr/local/hl7d-(version)/t/

For Perl version of hl7d server, there is a little change to make it running successfully under OS X environment.

After the installation of hl7d, please change the line for LocalPort setting in hl7d.pl as follow:
# establish SERVER socket, bind and listen.
#
my $server = new Net::HL7::Daemon
    (
  #LocalPort => $cfg{PORT},
         LocalPort => 12002,
         Listen    => $cfg{LISTEN}
     );
$server or die "Couldn't create daemon";
This makes sure hl7d daemon starts properly at port 12002.

To start hl7d server in debug mode, please type in the command:
$ /usr/local/hl7d-/hl7d.pl --nodetach --debug

And then you can try sample client Perl scripts within /usr/local/hl7d-/t/ subfolder in another Terminal Window. When succeeded, you will receive messages from the Terminal which hl7d server is running.

For PHP web application in XAMPP, you must install another module Net_Socket first:
$ /Applications/XAMPP/xamppfiles/bin/pear install Net_Socket

To test out PHP script running within XAMPP web application, you can create test.php file:
<?php
require_once "Net/HL7/Segments/MSH.php";
require_once "Net/HL7/Message.php";
require_once "Net/HL7/Connection.php";
require_once 'Net/Socket.php';

$msg  = new Net_HL7_Message();
$msg->addSegment(new Net_HL7_Segments_MSH());

$seg1 = new Net_HL7_Segment("PID");

$seg1->setField(3, "XXX");

$msg->addSegment($seg1);

echo "
Trying to connect
"; $socket = new Net_Socket(); $success = $socket->connect("localhost", 12002); if ($success instanceof PEAR_Error) {     echo "
Error: {$success->getMessage()}
";     exit(-1); } $conn = new Net_HL7_Connection($socket); echo "
Sending message\n" . $msg->toString(true) . "
"; $resp = $conn->send($msg); $resp || exit(-1); echo "
Received answer\n" . $resp->toString(true) . "
"; $conn->close(); ?>

Friday, April 17, 2015

Tackling missing SSL intermediate keychain certificate issue on Apache

One of my clients has been complaining about an error message like the one below when they visit some secured web sites via HTTPS protocol on the browser, particular Mozilla Firefox.

The certificate is not trusted because no issuer chain was provided.
(Error code: sec_error_unknown_issuer)

Firefox is well-known open source web browser which has been sticking with W3C standard. For HTTPS tunnel initialisation, Firefox checks through public certificates down to root certificate in order to tell the user whether the connection is completely secured. Among those certificates, the intermediate keychain certificate was ignored in the past by the web browsers. It's not hard to imagine some browser may even automatically try to search and put back this missing piece into the keychain store.

Somehow, it might be difficult to draw a fine line between the responsibility of browser's developer and website administrator. However, there is still something Web Administrator can do to resolve this.

Assuming you are hosting Apache webserver for the target website, try the following URL to check whether there is any problem with the SSL certificates installed on the target website:

https://www.sslshopper.com/ssl-checker.html

Once an error of missing intermediate keychain certificate is found, it's time to proceed to next step for checking which intermediate certificate to install on webserver.

Visit the target website and click on the lock icon to get more information about the SSL certificate already installed. From the certificate information, check the name of issuing authority in order to identify which SSL provider and package you are using.

Go to the website of SSL provider and find relevant intermediate keychain certificate which is supposed to be opened to the public for downloading.

The file content should be something like this:

-----BEGIN CERTIFICATE-----
ENCRYPTED TEXT...
-----END CERTIFICATE-----

Once you've got the intermediate keychain certificate, you can reconfigure Apache to use it to complete the keychain for HTTPS validation.

On hosting server, find Apache SSL configuration file like httpd-ssl.conf and add a line (in red) to specific the intermediate keychain certificate for use:

SSLEngine On
SSLCertificateFile /TargetPath/somedomain.crt
SSLCertificateKeyFile /TargetPath/somedomain.key
SSLCertificateChainFile /TargetPath/intermediates_keychain_cert.crt

When finished, please restart Apache server and then test the secured URL (https://...) of target website with Firefox again. If all certificate and key files are in place on webserver, the error message should go away.


Friday, February 27, 2015

Reduce memory consumption on MySQL 5.6

It's been a while since I come back to check MySQL configuration on my development machine. Just feel a bit surprised that it looks like running really big databases within there. When I restarted it, I noticed that MySQL takes over 500 MB in memory usage. Actually, I didn't even start Apache server which comes with XAMPP package.

Current version of MySQL is 5.6.16. Even I'm quite happy with the database performance, it would be nice to save some resources for the other development tools running in parallel, especially for the big Eclipse IDE.

As long as it's not running as production machine, I'm fine with reducing the memory footprint a bit, actually, quite a bit.

Find my.cnf or my.ini for running MySQL instance and add/change the line as follow:

[mysqld]
performance_schema = off
Have a restart for MySQL service and the memory consumption is dropped back to under 100 MB which is fantastic!

Note: The MySQL Performance Schema is a feature for monitoring MySQL Server execution at a low level. You can turn it back on anytime for performance tuning by setting "performance_schema = on".


Tuesday, February 10, 2015

Installing PHP Accelerator ZendOpcahe on Apache 2.4 for Windows

It's Windows platform again and it's all about how to make it fast on running Apache server. It may be easier to find useful materials for Linux platform.

Supposing you are using XAMPP for Windows 1.8.x, you will feel curious about where ZendOpcache module is sitting. It's not there and you'll need to download it yourself.

Opcode caching is a good way to improve PHP performance as it takes out the compiling time of PHP source code for each consecutive loading after the first time that piece of PHP script is loaded and served.

Here're the steps:

1. Please download the package (version as of today is 7.0.4) via the following link:
http://windows.php.net/downloads/pecl/releases/opcache/7.0.4/php_opcache-7.0.4-5.4-ts-vc9-x86.zip

2. Stop Apache Service.

3. Download and extract the library file “php_opcache.dll” and copy it into the directory “C:\xampp\php\ext\”.

4. Add the following lines (marked in red) to the end of PHP configuration file:

.
.
.
C:\xampp\php\php.ini

 …

 ; ; set in php ini file only

 ; ; make sure it's readable (open_basedir is checked) by coverage viewer script

 ; xcache.coveragedump_directory = ""

 ; ;; END OF XCACHE CONFIG


 [Zend_Opcache]

 zend_extension = "C:\xampp\php\ext\php_opcache.dll"

 opcache.memory_consumption=128

 opcache.interned_strings_buffer=8

 opcache.max_accelerated_files=4000

 opcache.revalidate_freq=60

 opcache.fast_shutdown=1

 opcache.enable_cli=1

.
.
.

5. Start Apache service.

6. Examine and check if the libraries are loading properly via http://localhost/xampp/phpinfo.php


Configuration of mod_fcgid in XAMPP Apache for Windows

First thing first, which one is the fastest of serving PHP source?

Here's a nice comparison on various PHP implementations in Apache:

http://2bits.com/articles/apache-fcgid-acceptable-performance-and-better-resource-utilization.html

Interesting points here:


Apache's mod_php
Apache's mod_php is the most widely used mode for PHP with Apache. mod_php itself is the entire PHP interpreter embedded in each Apache process that gets spawned. This provides performance and stability benefits, e.g.
No need to call an external process (e.g. CGI).
No need to communicate with another process via sockets (e.g. Fast CGI).
The APC cache is shared by all Apache processes.
It also has some disadvantages
The memory footprint per Apache process is large, specially when sites indulge in contributed modules.
If Apache is serving static content, e.g. images and CSS files, it still has to spawn large processes because of the embedded PHP interpreter.


CGI
CGI (Common Gateway Interface) is the legacy way of runing applications on the web from the mid 1990s or so. It was too inefficient for anything but small sites. CGI spawns a new process for every incoming request to execute a PHP script, a very resource intensive and inefficient way of doing things. No wonder it faded away over time as web applications became more complex.


FastCGI
FastCGI was introduced to avoid some of the issues with running languages, including PHP, inside the Apache process, as well as avoiding the inefficiency of CGI.
A FastCGI application is executed outside of the web server (Apache or other wise), and waits for requests from the web server using a socket. The web server and the FastCGI application can even be on separate physical machines and communicate over the network.
Because the web server and the application processes are separate better isolation is possible.
In reality, running PHP as mod_fastcgi with Apache has proved to be problematic. Mainly with stability. Even on Drupal.org we tried it for a while, but switched back to mod_php after some time.


mod_fcgid
mod_fcgid was introduced to be binary compatible with FastCGI, but with better control over spawning processes. The benefits of process isolation are still there.


Looks like a brief history on how CGI evolves.

mod_fcgid is a high performance alternative to mod_cgi or mod_cgid, which starts a sufficient number instances of the CGI program to handle concurrent requests, and these programs remain running to handle further incoming requests.

The Apache Software Foundation and the Apache HTTP Server Project are pleased to announce the release of version 2.3.9 of mod_fcgid, a FastCGI implementation for Apache HTTP Server versions 2.0, 2.2, and 2.4. This version of mod_fcgid is a security release.

I have been searching around for the way to implement mod_fcgid in Apache 2.4 for Windows which is embedded in XAMPP 1.8.x package.

Here's the procedure that would work on Windows:

1. Please download the zip package via the following link:
https://www.apachelounge.com/download/win32/modules-2.4/mod_fcgid-2.3.9-win32.zip

2. Stop Apache service.

3. Expand and extract the library file “mod_fcgid.so” and then copy it under the directory C:\xampp\apache\modules\.

4. Create new configuration file with the following content (adjust the actual paths of XAMPP installation directory to suit the needs):

C:\xampp\apache\conf\extra\httpd-fcgid.conf

##################################################################

 # Configuration for mod_fcgid

 # FileName: conf/extras/mod_fcgid_php.conf


 # Fast CGI module Settings (PHP 5.3, 5.4)


  FcgidInitialEnv PHPRC "C:\\xampp\\php"

  FcgidInitialEnv PATH "C:\\xampp\\php;C:\\WINDOWS\\system32;C:\\WINDOWS;C:\\WINDOWS\\System32\\Wbem;"

  FcgidInitialEnv SystemRoot "C:\\Windows"

  FcgidInitialEnv SystemDrive "C:"

  FcgidInitialEnv TEMP "C:\\WINDOWS\\TEMP"

  FcgidInitialEnv TMP "C:\\WINDOWS\\TEMP"

  FcgidInitialEnv windir "C:\\WINDOWS"


 # Fast CGI module Settings (PHP 5.2)


 # FcgidInitialEnv PHPRC "C:/php/"

 # FcgidInitialEnv PATH "C:/php;C:/WINDOWS/system32;C:/WINDOWS;C:/WINDOWS/System32/Wbem;"

 # FcgidInitialEnv SystemRoot "C:/Windows"

 # FcgidInitialEnv SystemDrive "C:"

 # FcgidInitialEnv TEMP "C:/WINDOWS/TEMP"

 # FcgidInitialEnv TMP "C:/WINDOWS/TEMP"

 # FcgidInitialEnv windir "C:/WINDOWS"


 # Global mod_fcgid settings


  FcgidIOTimeout 40

  FcgidConnectTimeout 10

  FcgidMaxProcesses 8

  FcgidOutputBufferSize 64

  ProcessLifeTime 240

  FcgidMaxRequestsPerProcess 500

  FcgidMinProcessesPerClass 0


 # Global Config Example

 # Comment out next 4 lines to use per-Directory or per-VirtualHost configuration


     #Options ExecCGI

  Options Indexes FollowSymLinks ExecCGI

     AddHandler fcgid-script .php

     FcgidWrapper "C:/xampp/php/php-cgi.exe" .php


 #

 # Examples below show how you can use per-Directory and per- VirtualHost Configs

 # You can use multiple Directory and VirtualHost Configs at the same time

 #


 # Per Directory Config Example

 #

 #

 #  FcgidInitialEnv PHPRC "C:/php"

 #  AddHandler fcgid-script .php

 #  Options Indexes FollowSymLinks ExecCGI

 #  AllowOverride all

 #  FcgidWrapper "C:/php/php-cgi.exe" .php

 #  Require all granted

 #


 # Per VirtualHost Config Example

 #

 #

 # DocumentRoot  /Apache22/htdocs/fcgi

 # ServerName fcgi.local

 # ErrorLog logs/fcgi.error.log

 # CustomLog logs/fcgi.access.log common

 # FcgidInitialEnv PHPRC "C:/php"

 #

 #  AddHandler fcgid-script .php

 #  Options Indexes FollowSymLinks ExecCGI

 #  AllowOverride all

 #  FcgidWrapper "C:/php/php-cgi.exe" .php

 #   Require all granted

 #

 #


 # Do not comment out below line


 ######################################################################


5. Add new lines to the following configuration file:
C:\xampp\apache\conf\httpd.conf
…

#LoadModule watchdog_module modules/mod_watchdog.so

#LoadModule xml2enc_module modules/mod_xml2enc.so

LoadModule fcgid_module modules/mod_fcgid.so


…

#FCGI Module

 Include "conf/extra/httpd-fcgid.conf"

#End of file


6. Comment out several lines to the following configuration file:
C:\xampp\apache\conf\extra\httpd-xampp.conf
…

#
# PHP-Module setup
#
LoadFile "C:/xampp/php/php5ts.dll"
LoadFile "C:/xampp/php/libpq.dll"
LoadModule php5_module "C:/xampp/php/php5apache2_4.dll"

#Comment out to use purely mod_fcgid to serve all .php files, see httpd-fcgid.conf
#
#    SetHandler application/x-httpd-php
#
#
#    SetHandler application/x-httpd-php-source
#
7. Start Apache service and test the web pages.

8. Examine and check if the libraries (including mod_fcgid) are loading properly via http://localhost/xampp/phpinfo.php


Saturday, January 31, 2015

Pfsense 2.2 Upgrade and OpenVM Tools installation

Pfsense 2.2 is out now whereas I couldn't wait to upgrade the guest VM for this.

Then OpenVM Tools seems to be unable to load up. 

Errors appear in the login console:
KLD vmmemctl.ko: depends on kernel - not available or version mismatch
linker_load_file: Unsupported file type
KLD vmxnet.ko: depends on kernel - not available or version mismatch
linker_load_file: Unsupported file type
KLD vmblock.ko: depends on kernel - not available or version mismatch
linker_load_file: Unsupported file type
KLD vmhgfs.ko: depends on kernel - not available or version mismatch
linker_load_file: Unsupported file type

Using command kldstat only shows up somthing like this:
$ kldstat
Id Refs Address    Size     Name
 1    8 0xc0400000 93ca60   kernel
It sounds like vmxnet.ko and the other OpenVM drivers not loading up properly.

Pfsense 2.2 is based on FreeBSD 10.1 which may not be compatible with the way that works in FreeBSD 9.x. Someone in the forum suggested that:

For now Vmware is not supporting FreeBSD version 10. You must wait with upgrade to VSphere 6.

Yet we can't wait, can we? 

Quick solution is trying to install OpenVM Tools from FreeBSD ports via pfsense console itself:

pkg install open-vm-tools-nox11

After installation, try the following as well:

To run the Open Virtual Machine tools at startup, add the following
settings to your /etc/rc.conf :
vmware_guest_vmblock_enable="YES"
vmware_guest_vmhgfs_enable="YES"
vmware_guest_vmmemctl_enable="YES"
vmware_guest_vmxnet_enable="YES"
vmware_guestd_enable="YES"
After a reboot, vmxnet.ko drivers should load up again as follows.
$ kldstat
Id Refs Address    Size     Name
 1    8 0xc0400000 93ca60   kernel
 2    1 0xc0d3d000 6a32c    acpi.ko
 3    1 0xc20d1000 3000     vmmemctl.ko
 4    1 0xc20f5000 4000     vmxnet.ko
 5    1 0xc20f9000 5000     vmblock.ko
 6    1 0xc20fe000 a000     vmhgfs.ko