Showing posts with label ubuntu. Show all posts

Wednesday, March 15, 2017

Fix Acer Aspire ONE Ubuntu "Freezing" Issue (Ubuntu 14.04, 16.04)

Previously, I was looking at Official Ubuntu help page for Acer Aspire series for help but it didn't really work at all. It told us to set the following:

intel_idle.max_cstate=3

I have turned to add the following option to the boot parameters to solve system freezing when the power is connected:

intel_idle.max_cstate=1

Just add it to the GRUB_CMDLINE_LINUX_DEFAULT string in /etc/default/grub.

$
$
$ sudo update-grub
$ sudo reboot now
$
$

c_state = 1 makes CPU running at full power and not falling asleep anymore. It's such a power hunger setting for battery life but it fixed the random freeze issue.

For more advanced option of C state which may suits different CPUs categories. Please check:
http://www.hardwaresecrets.com/everything-you-need-to-know-about-the-cpu-c-states-power-saving-modes/


Thursday, April 14, 2016

Adding Fail2Ban UFW Portscan Filter on Ubuntu

To further prevent portscan from bad bots around the world, there's a way of making use of Fail2Ban filter.

Assuming Fail2Ban is in place, edit the config file as below;
$ sudo nano /etc/fail2ban/jail.local

Add new section in jail.local:

[ufw-port-scan]

enabled   = true
ignoreip  = 127.0.0.1/8
port      = all
filter    = ufw-port-scan
banaction = ufw
logpath   = /var/log/ufw.log
maxretry  = 20

Create new filter as follows:
$ sudo nano /etc/fail2ban/filter.d/ufw-port-scan.conf

Add new lines in ufw-port-scan.conf:
[Definition]
failregex = .*\[UFW BLOCK\] IN=.* SRC=
ignoreregex =
Create ban action config file as follows:


$ sudo nano /etc/fail2ban/action.d/ufw.conf

Add new lines in ufw.conf:


[Definition]
actionstart =
actionstop =
actioncheck =
actionban = ufw insert 1 deny from  to any
actionunban = ufw delete deny from  to any

Have a service restart and it's good to go.
$ sudo service fail2ban restart

It's possible to run a test for the regex rule as well:
$ fail2ban-regex /var/log/ufw.log '.*\[UFW BLOCK\] IN=.* SRC='

Then you might get some results back like these:

Running tests
=============

Use   failregex line : .*\[UFW BLOCK\] IN=.* SRC=
Use         log file : /var/log/ufw.log.1


Results
=======

Failregex: 163 total
|-  #) [# of hits] regular expression
|   1) [163] .*\[UFW BLOCK\] IN=.* SRC=
`-

Ignoreregex: 0 total

Date template hits:
|- [# of hits] date format
|  [163] MONTH Day Hour:Minute:Second
`-

Lines: 163 lines, 0 ignored, 163 matched, 0 missed


Friday, November 6, 2015

Install PHP 7 + mod_fcgid + opcache on Ubuntu 14.04


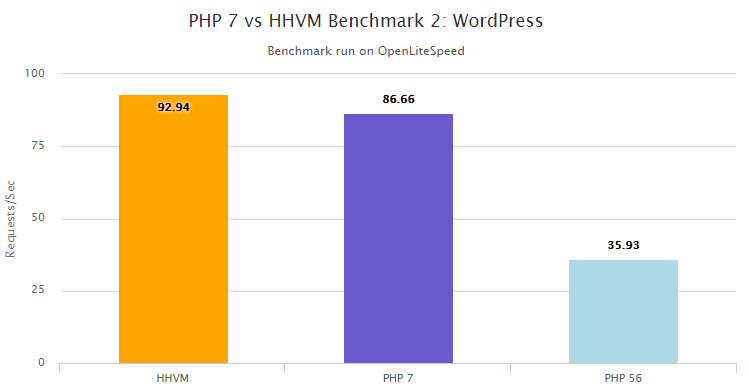
PHP 7 has become a hot topic in recent time as it claims to have the running speed catching up with HHVM whereas no big change in the source code is required, except for those deprecated function calls in the new release.

This is good news as nowadays Guest VM for hosting tends to be slim and small in terms of resources, i.e., 512MB, 256MB or smaller. Running a plain old build of Apache server with default settings is going to slow down everything.

This is a quick guide for a fresh installation of LAMPP server with newest PHP 7 engine on top of it. To maintain high response rates without interruption in a high concurrency situation, you may want to run PHP in CGI mode. Please check those steps below carefully. For the god sake, you might miss something along the passage without the help of a cup of coffee which is exactly my situation.

PHP 7 is now in the final stage before the official release is out. So, the source update is happening frequently than ever. As of the time of writing, it is PHP 7.0.0 RC 6. Of course, no one would like to miss that bit, even for nightly update.


Here we start in Terminal app on Ubuntu 14.04:

Step 1:


Try installing LAMPP from the ground up:

$
$ sudo apt-get update && sudo apt-get install lamp-server^


Please mind the caret (^) at the end.

You will have to install packages for Apache 2, MySQL & PHP 5 (not PHP 7 at the moment).

Step 2: (Optional)


You might want to upgrade a bit for the not-so-entirely-new version of Apache 2 which is locked in version 2.4.7 in Ubuntu 14.04 LTS Release as LTS implies not only a stable build but also less frequent update to its packages.

For upgrading Apache 2, you may add new repo to Ubuntu's source list and do a forced re-installation:

$
$ sudo apt-get install python-software-properties
$ sudo add-apt-repository ppa:ondrej/apache2
$ sudo apt-get update && sudo apt-get -f install apache2
$

Step 3:
Obtain PHP 7 early release


This is to add Zends PHP7 early access repo:

$
$ sudo echo "deb http://repos.zend.com/zend-server/early-access/php7/repos ubuntu/" >> /etc/apt/sources.list
$


To install PHP7 nighly build, we need to issue the following command:

$
$ sudo apt-get update && sudo apt-get install php7-nightly
$


Once done, PHP7 will be installed to /usr/local/php7. So you might want to keep this in mind to find something important regarding PHP configuration.

To use PHP7 with Apache, first make sure Step 1 is done properly, then copy the required modules and libs to Apache 2 folder:

$
$ sudo cp /usr/local/php7/libphp7.so /usr/lib/apache2/modules/
$ sudo cp /usr/local/php7/php7.load /etc/apache2/mods-available/
$


For initial PHP with OpCache configuration, we can create new php.ini in the following path:

/usr/local/php7/php.ini

Please copy and paste the following parameters into php.ini:
max_execution_time=600
memory_limit=128M
error_reporting=0
display_errors=0
log_errors=0
user_ini.filename=
realpath_cache_size=2M
cgi.check_shebang_line=0
zend_extension=opcache.so
opcache.enable_cli=1
opcache.save_comments=0
opcache.fast_shutdown=1
opcache.validate_timestamps=1
opcache.revalidate_freq=60
opcache.use_cwd=1
opcache.max_accelerated_files=100000
opcache.max_wasted_percentage=5
opcache.memory_consumption=128
opcache.consistency_checks=0


Step 4:
Install mod_fcgid module


$
$ sudo apt-get install libapache2-mod-fcgid
$


Step 5:
Enable and disable relevant Apache modules


Default build of Apache use MPM Event but for mod_fcgid to work we need to enable MPM Worker instead. Before enabling new MPM, we need to disable previously enabled MPM modules first.

For one important thing here, you might have to entirely disable PHP5 module in order to avoid any conflict with the upcoming PHP7. Apache can't have both PHP5 and PHP7 modules loaded for the same .php filetype handling or else Apache won't even start.

$
$ sudo a2dismod mpm_event
$ sudo a2dismod mpm_prefork
$ sudo a2enmod mpm_worker
$ sudo a2dismod php5
$


Step 6:
Enable SSL in Apache


Enable SSL module as follow:

$
$ sudo a2enmod ssl
$ sudo mkdir /etc/apache2/ssl
$

Prepare self-signed certificate:

$
$ sudo openssl req -x509 -nodes -days 3650 -newkey rsa:2048 -keyout /etc/apache2/ssl/apache.key -out /etc/apache2/ssl/apache.crt
$

The key and certificate will be created and placed in your /etc/apache2/ssl directory.

Open the default SSL configuration file with root privileges now:

$
$ sudo nano /etc/apache2/sites-available/default-ssl.conf
$

Modify two lines to match the newly created certificate files:

        SSLCertificateFile /etc/apache2/ssl/apache.crt
        SSLCertificateKeyFile /etc/apache2/ssl/apache.key

And finally it may look like this:
<IfModule mod_ssl.c>
    <VirtualHost _default_:443>
        ServerAdmin webmaster@localhost
        DocumentRoot /var/www/html
        ErrorLog ${APACHE_LOG_DIR}/error.log
        CustomLog ${APACHE_LOG_DIR}/access.log combined
        SSLEngine on
        SSLCertificateFile /etc/apache2/ssl/apache.crt
        SSLCertificateKeyFile /etc/apache2/ssl/apache.key
        <FilesMatch "\.(cgi|shtml|phtml|php)$">
                        SSLOptions +StdEnvVars
        </FilesMatch>
        <Directory /usr/lib/cgi-bin>
                        SSLOptions +StdEnvVars
        </Directory>
        BrowserMatch "MSIE [2-6]" \
                        nokeepalive ssl-unclean-shutdown \
                        downgrade-1.0 force-response-1.0
        BrowserMatch "MSIE [7-9]" ssl-unclean-shutdown
    </VirtualHost>
</IfModule>

To activate SSL Virtual Host, please type:

$
$ sudo a2ensite default-ssl.conf
$


Step 7:
Add mod_fcgid related configurations


Go find the default configuration files for Apache, like

/etc/apache2/sites-enabled/000-default.conf

/etc/apache2/sites-enabled/default-ssl.conf

Edit each file with the following instructions.

Add the following configuration to the root directory section in the vhost block:

<Ifmodule mod_fcgid.c>
 # FCGID registers a handler named fcgid-script
 AddHandler fcgid-script .php
 Options +ExecCGI
 FcgidWrapper /usr/local/php7/bin/php-fcgid-wrapper
</IfModule>


Also, add the relevant settings outside the vhost block:

<Ifmodule mod_fcgid.c>
 # Context - server config
 FcgidMaxProcesses 150
 # Otherwise php output shall be buffered
 FcgidOutputBufferSize 0
</IfModule>


Step 8:
Add Wrapper script of php-cgi


Now you need to create the wrapper script that is used by mod_fcgid to launch php-cgi processes.

Script filename: php-fcgid-wrapper

#!/bin/sh
# Set desired PHP_FCGI_* environment variables.
# Example:
# PHP FastCGI processes exit after 500 requests by default.
PHP_FCGI_MAX_REQUESTS=10000
export PHP_FCGI_MAX_REQUESTS
# Replace with the path to your FastCGI-enabled PHP executable
exec /usr/local/php7/php-cgi


The actual location of the wrapper script at /usr/local/php7/bin/php-fcgid-wrapper can be stored anywhere and the path has to be mentioned in apache configuration.

Make the wrapper script executable using chmod:

$
$ chmod +x /usr/local/php7/bin/php-fcgid-wrapper
$


Step 9:
Turn on Apache server


This is the final and the most important step for all those configurations we have made:

$
$ sudo service apache2 restart
$

Step 10:
Testing


You can open a browser locally and visit https://localhost to check if SSL connection is working properly.

Or, try create a simple php info page to see if all parameters are setting as desired:

$
$ sudo echo "<php phpinfo();" /var/www/html/test_me.php
$

It's been a long time PHP's performance seems to be lagging behind since Facebook's era comes. People who are aggressive might lean to take HHVM approach to accelerate things up, yet the development team might meet new challenges with switching coding practice and taking the risk of incompatibility with official PHP release.


You go for the option of PHP7 as you have the needs for speed. Forgetting about compatibility and performance sacrifice, let's test your apps with this brand new PHP engine!



Monday, February 25, 2013

Auto start Nginx on Linux reboot

After compiling Nginx from the source on older release of Ubuntu server, there are some steps to be performed in order to let Nginx service start automatically after a system reboot.

A startup script can be obtained here:
https://github.com/JasonGiedymin/nginx-init-ubuntu/blob/master/nginx

This script will be saved to /etc/init.d/nginx

However, there are additional changes on this script file in order to make it running properly.

For the existing version of Nginx v1.2.7, a couple of changes are required for pointing to the correct path of related files as follows:


# processname: nginx
# config:      /usr/local/nginx/conf/nginx.conf
# pidfile:     /usr/local/nginx/logs/nginx.pid
# Provides:    nginx


PATH=/usr/local/nginx/sbin:/usr/local/sbin:/usr/local/bin:/sbin:/bin:/usr/sbin:/usr/bin
DAEMON=/usr/local/nginx/sbin/nginx

NGINX_CONF_FILE="/usr/local/nginx/conf/nginx.conf"


Once the changes are saved successfully, it'll be ready to add Nginx to the list of startup service on the server.

First, change the file permission as follows:

sudo chmod +x /etc/init.d/nginx


Second, use the following command to update the default run level of the startup script:

sudo /usr/sbin/update-rc.d -f nginx defaults 


After these, Nginx service will be started by itself during next system reboot.

You can also perform various tasks manually via the following command syntax:

sudo /etc/init.d/nginx (start|stop|reload|status)


Monday, January 9, 2012

Remotely unlocking LUKS encrypted root partition via SSH

It has been a while since famous DropBear script invented and became Ubuntu package for streamlining the unlocking mechanism of encrypted partition remotely from client computer.

Recently, an inspiring article has been found for a practical approach to this special feature. Of course, it might involve some manual operations during the server reboots and wait for your input to unlock it.

A working solution tested on Ubuntu 9.10 Karmic Koala:

Assuming you have an Ubuntu machine with fully encrypted partition, and you would like to unlock this partition during the boot-up but you are not sitting there in front of the machine. Definitely, you can do it somewhere with another computer.

On Ubuntu machine:

To setup Dropbear SSH Server:
$

$ sudo apt-get install dropbear busybox


Please remind that the package like early-ssh is not required in this case and it is assumed that a working OpenSSH server has been installed and running properly.

Latest version like Ubuntu 11.04 might have problems with the original dropbear script and requires manual modification. It is recommended to refer to  this link for more information.

Now update INITRAMFS:
$

$ update-initramfs -u

It's time to enable the root account in Ubuntu whereas only root user can login Dropbear SSH Server successfully.
$

$ sudo passwd root


You must take extra precaution while enabling root account can lead to security issue on your OpenSSH service. It is recommended to disable root login for OpenSSH by changing the following lines in /etc/ssh/sshd_config.
# change in /etc/ssh/sshd_config

PermitRootLogin no

This is useful in preventing the outsider trying to login as root.

Within the timeframe of DropBear SSH session, the root account is effective anyway. After the unlock operation is finished, DropBear will let the regular OpenSSH server to take over and retires gracefully. Therefore, you may expect DropBear session to be disconnected after you enter correct passphrase to unlock the partition. Then you will need to login again with its OpenSSH session instead.

Before restarting the machine, it is necessary to copy the private key out of Dropbear SSH Server.
A reference command would be like this (assuming you use Linux client to connect to Ubuntu machine):
#Use SCP to copy a certificate from remote machine to local Linux machine
scp user@remote.server:/etc/initramfs-tools/root/.ssh/id_rsa ~/.ssh/remote_dropbear_id_rsa


If you are using Windows client, then you can download WinSCP to copy the file directly onto your desktop. You might notice that an error occurs while you are copying due to file permission. This means you need to set a proper file permission of id_rsa on Ubuntu machine before you copy it out.

After that, reboot your Ubuntu machine and wait for the prompt of passphrase. However, Dropbear SSH Server will also loaded up behind the scene and wait for the authenticated client to enter passphrase remotely. Who is the authenticated client? That might be the one holding the private key generated by Ubuntu machine.

On Client computer:

Assuming you use Windows client to connect and you will need two pieces of software to make it work
Putty.exe
Puttygen.exe

Basically, comprehensive package of Putty includes both of these executables once you download and install its Windows installer from here.

Native Linux generated private key needs to be converted to .PPK file for import in Putty client. That's why we need Puttygen.exe. For instructions, please refer to this link under the section of "Converting the OpenSSH private key to Putty format". To login remotely with the converted private key, please refer to the section of "Logging in Openssh using id_rsa.ppk".

When Ubuntu machine is rebooted and pending for passphrase input, you can login from the client computer remotely with Putty.exe with a proper private key. Bear in mind that you need to login as root user into DropBear SSH console.

Once you login successfully to Dropbear console, you can enter the passphrase from there with a script command:
$

$ echo -ne "**encryptionpassphrase**" > /lib/cryptsetup/passfifo


whereas **encryptionpassphrase** is the required passphrase to unlock the encrypted partition.

You may not notice anything over the console. If the passphrase matches, Ubuntu machine will unlock the disk partition and start to load up at the other side. You can close Dropbear console and then login again into the OpenSSH console of Ubuntu machine with you regular user account from the client computer.

Note: An issue has been experienced regarding IP address distributed by DHCP server. To prevent a different IP address allocated to Ubuntu machine after reboot. It is necessary to setup static IP configuration to make sure IP address unchanged even after Dropbear SSH server loads up. Please refer to this link for more information.


Monday, August 17, 2009

PHP Sendmail problem on Ubuntu

For most general PHP functions like mail(), XAMPP package always works well on Win32 platform with its pre-defined settings. For linux distro like Ubuntu, you need to do extra steps to make it work.

1. You must be sure that you have run the following commands:


2. Come to your php.ini and edit like this (you'd better search php.ini yourself by issuing 'locate' command):


3. One extra thing to fix unqualified host name issue with error message like 'unable to qualify my own domain name'. Open and edit /etc/hosts as follows:

Let's say you have your machine locally named 'yourserver', add it with postfix '.local'

127.0.0.1 yourserver.local localhost

4. Restart Apache server or your LAMPP server to make PHP settings effective.

Now your PHP code should work on using mail() function for sending email message out.

Monday, August 10, 2009

Start vnc4server automatically on Ubuntu bootup

Nice to find an article talking about how to deal with vnc4server on Xubuntu, especially for auto startup. With my imagination, now it's for Ubuntu use as well;>

Making vnc4server start automatically

You can make your vnc4server start automatically with a simple one-line script.


Paste the following into the script editing the resolution to your liking:


Now save the file and exit nano. You'll also need to make the file an executable, do so with the following command:


Finally, to have this script run automatically, simply add it to your startup group:


To remove it from your startup list, do this:


For Gnome user, better do this:

Tuesday, August 4, 2009

Add MySQL Authentication feature to Apache2 on Ubuntu

mod_auth_mysql is said to have served the web community pretty well along the time and most developers, even though not all of them, find it useful and love it. I can see the complaints about this module as the development of Apache server keeps going. In terms of security and management, using MySQL as a permanent store for user accounts is better than using plain text file. As long as the way to carry out web authentication is shifted from traditional pop-up browser window, to Application Server's own session control, it is still valuable to retain such usage for MySQL Authentication. As new version of XAMPP package comes out, the mod_auth_mysql module seems to be missed out. Actually, you need to build one yourself. Of course, I assume you are using Ubuntu.

An article from Europe may help building DSO module ourselves. Just download the right stuff, patch it, build it and install it.

Something else need to be done according to the linked article, mostly likely a little change in .htaccess under the protected directory.

Another article aims at clarifying the usage and configuration of mod_auth_mysql module in .htaccess file. Very useful! I have missed out some parameters mentioned there and couldn't make the authentication work on Ubuntu.

For .htacess, I do have the following comments:

To eliminate any unnecessary complaints from Apache itself, add the following line first:
AuthUserFile /dev/null

However, some articles point out that the following line should be COMMENTED OUT, especially for Apache2.X:
#AuthGroupFile /dev/null

When using mod_auth_mysql, it is a must to tell Apache which MySQL socket be used. Otherwise, you may receive complaint like:
MySQL ERROR: Can't connect to local MySQL server through socket '...'
MySQL user ... not found:...


This problem can be solved by adding the following line:

AuthMySQLSocket "full/path/to/mysql.sock"

This helps Apache finding the right MySQL socket for successful connections.

It seems that we'd better declare everything whether it is default or not. This will help identifying any problem in the configuration.